Friday, December 19, 2008

snow day

So the title is a little misleading... this post is not about snow even though it is snowing outside. Just thought I'd show off the extent of our Christmas decorating this year:
Yes, that's all.
Here are a couple of photos showing the bathroom's current state:

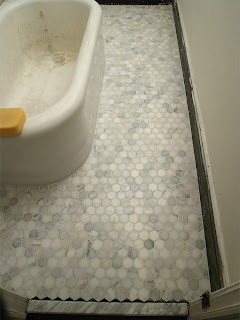
We actually don't have swine bathing in our tub. That's grout, joint compound, plaster dust - all kinds of icky stuff that's fallen in there during the work. I haven't scrubbed it yet because it's not finished being filthy yet.
The tiles still have haze on them from grouting here - this was just after the grout was finished. We're showing you the current status of the bathroom. It's sort of like reality TV except here you actually get to see reality. The walls need more skimcoat, the baseboards and trim need patching and painting, the overhead lights are not in yet because we need to paint the ceiling first (and can't decide on a paint color.) Reality.
This is our new soap dish embedded in the wall:
It was designed by my Father and Fernando and the nice people at the place where we bought the wall tile (Monumental Marble) made it for us. It's carrara marble and was cut to mimic the shape of the tub. On top, there are two small indentations for soap. It's quite heavy and partially sits on a beam about 2" inside of the wall for stability. If we are lucky, it will never fall out. ;)
Happy snow day!

Tuesday, December 16, 2008

It is official.

I neglect my blog. I could blame the holidays but I'm going to blame the house. The house is eating into my blogging time but I blog about the house. It's an endless cycle.
Here's the latest photo of our subbasement (sub-basement, sub basement?)

It's currently moonlighting as a wading pool. We must have a crack somewhere down there and that last rainstorm flooded the little room. Fernando tried to bucket it out but gave up after about bucket number 25. I hope it doesn't freeze. It's not a huge deal because we can't really use that room (formerly a coal chute) at the moment for anything. It doesn't have electricity and usually holds the day job of spider farm. It's just another project to get too - hopefully before it freezes and more cracks develop.

Our floors and stairs are finished!

I do love them. The finish is not glossy and just like I expected a satin finish to be, even though it's semi-gloss. This photo was taken at night and the flash penetrated the layers of poly, showing it to be more brown than black. It does read black when you see it in person. I can't wait to paint those baseboards and am actually looking forward to a little time off to get to paintin'.
As for the bedroom paint color - I think the swatch was lost in the clean-up. I know I should remember the name but we debated over two, the other being BM's "Calm" and this other color won. I need to have more mixed for the baseboards so I'll ask the name of the color when I get to the store.
We've also had some exciting (for me) things delivered - more on that later. I promise to add more photos of the refinished floor, painted bedrooms, and yes the forgotten upstairs BATHROOM hopefully soon...

Tuesday, December 2, 2008

We can't go inside.

We have been patiently waiting. The first two coats of poly are down. It shouldn't be this shiny in the end - they first use high gloss poly for a harder surface and then they will finish with either satin or semi-gloss. This is what it all looks like from the front door:

Really makes the unpainted stuff look super crappy huh? I was feeling like this was one of the final steps - but IT'S NEVER GOING TO BE OVER. I keep thinking of all of the things that we still have to do but we can't do anything until the floors dry. Not being able to do anything is making my head want to explode.
Why didn't I take the yard tools out of the basement before they started to put the stain down? And what will we find growing in that coffee cup on the windowsill?

Friday, November 21, 2008

oh sandy.

Living room paint color in action:
The medallion is not sealed yet in this photo - we have to add a bead of caulk since the old ceiling is a little wavy in some spots.
Oh and the floors have been started! This is our bedroom with the paint color whose name I still can't remember. It's a faint, pale-like thing. Check out the sanding transformation:


I really like the pale wood and almost have the urge to just seal it. The thing is - it's pretty stained up in some spots. Let's just say there were dogs living here before and they were not given the chance to catch some fresh air.
This is the room adjoining our bedroom aka: the office (what we will be using it for,) the nursery or the room with the bay window. My Father freaks out if we call it a bedroom. When asked why he calmly explains that bedrooms don't have bay windows. I don't get it either.
Those bags are filled with sawdust from our floors! We intend to paint this room the same color as our bedroom.

This is our kitchen! I knew there were decent floors under all of that gunk!
We're having a bit of patching done in here - on the right side where there was an intake vent. The vent currently leads to nothing and is no longer useful. I'm not sure what we're going to do with the former hearth though... perhaps use some leveling compound? We can't add wood over the concrete so it may be our only option. The stove will be covering most of this area.

What gunk you say? You can't see the gunk? Have look around the kitchen's first sanded patch:
Yuck.

Thursday, November 20, 2008

newly stripped

Fernando spent 3 days on this messy project. The banister and newel post needed to be stripped. Everything was covered in thick layers of flaking varnish and dirt resulting in a sort of burgundy color. He used denatured alcohol and everything from steel wool, to sandpaper, to paint brushes, to metal brushes and so many paper towels - it was hard to get that junk off! Now we can stain it all to match the floors. I thought white trim paint would be nice but I almost had my head torn off at the suggestion.


Completely stripped and a peak of the new ceiling paint here:

In other news, the floors are finally being refinished today! Well, the project is supposed to take about a week to complete... I'm happy it's finally begun. We've also put up the ceiling medallion in the living room, painted the foyer ceiling Lido Green by Benjamin Moore, painted the living room walls and ceiling a pale grey called Iced Cube Silver by BM, painted our bedroom a color that I can remember off the top of my head, replaced a few cracked windows, had a new home security system installed and added some blinds to the downstairs windows (finally.)
The upstairs bathroom is almost complete. I purchased the Axor Montreux Short Two Handle Lavatory Mixer faucet by Hansgrohe in chrome for the bathroom sink. It looks like this:


We had to order more subway tile (I wish I had a photo because the tiled wall is looking soooo good) because we decided to stop a few inches from the ceiling and so we needed bullnosed tiles to finish up. We also ran out of floor tiles because I apparently don't know how to use a tape measure. More have been ordered and after the wood floors are complete my Dad should be able to finish up. Here's a photo that's almost not worth showing but you can see how the floor is coming along:
I'm sorry, I know I need to post a big photo update soon...

Thursday, November 6, 2008

black as night, black as coal = too much to ask for

As you may know, we really wanted our floors stained black. It's a hard color to achieve on most woods without straight up paint or aniline dye. We've been working with a floor company to try to get our floors as dark as possible. After they had come by and put a few samples down they offered to do an entire room so that we could see how the color was really going to look. You can see the before and afters here:

The middle shot is one coat of "Cabot Penetrating Interior Oil Base Wood Stain" in Ebony and the right shot is 2 coats. It's pretty close to black but there is still some brown peeking through here and there. They seem to think it will be even darker after the coats of poly are applied. I don't know if that's true... I do like it and after having 4 floor companies come over, this is the closest to black I've seen! One of the companies even promised that their specially mixed black stain was black "like a crayon." On our floors it looked more brown than Minwax. The Cabot Ebony is definitely more black than Minwax's Ebony - so that's what we're going with. I'm guessing that if we had the time (and money) for 3 coats of stain we might actually achieve a true black but I'm also thinking that my floors are going to stop absorbing stain at some point - right?
I'm relieved to see that all of the mess left on our floors after the walls were skim coated came up no problem. That room in particular was really bad - it looked like someone dumped an entire bucket of joint compound in the center of the room!

Thursday, October 30, 2008

upstairs bathroom choices...

IKEA Höllviken sink:


Discovering the oval shaped IKEA Höllviken sink was very exciting. The only options I could see to fit in the small 22" space were pedestal sinks or a custom made vanity. I personally don't really like pedestal sinks. A custom made vanity would not work for us - for budget reasons and time constraints. I would rather just utilize the small closet next to the bathroom for toiletries. The IKEA Höllviken is only $90.00! It can be mounted on a wall or to a base. Most importantly, it measures 22 1/2" across - wide enough for us to use and not get water everywhere and small enough to fit into our space. Since we will be floating it on the wall we can have a little overhang over the tub.

I just need to decide on a faucet.

I don't think anyone will appreciate its size more than our cat Toby, whose favorite pastime is drinking water from the bathroom sink:


Kohler Cimarron Comfort Height two-piece round-front toilet:

This toilet is one of the first things that we purchased for the bathroom. The previous toilet was cracked (and gross.) In its short life it's already been installed upstairs and moved downstairs while we're working on the bathroom. When it makes its final trip upstairs we'll put a shorter toilet in the "powder closet."
Daltile 4" X 8" subway tile in Desert Gray on the walls:


I really love this tile. I love the larger scale for this small bathroom - 4"X8".
2" Carrara marble mosaic tile in a Hexagon pattern for the floors:

Again - we bought this in a larger scale. I think the 2" size will compliment the proportions of the subway tile. We were entirely inspired by the lovely Anna of Doorsixteen's bathroom renovation. She used Carrara marble hex on her floor and the results were amazing.
LaToscana Ornellaia Single Control Pressure Balanced Tub and Shower Kit:
One thing I learned while trying to find bathroom fixtures is that if you know nothing about plumbing, talk to your plumber before you shop. A few wrong purchases later and we now have this shower set by Latoscana. We did not purchase it in the "oil rubbed bronze" finish shown here but rather chrome (I couldn't find a photo of it in chrome.) Bathroom fixtures are frustrating - we liked different items but to get the diverter/volume control of this set we had to buy the entire thing. The piece we wanted only came separate in "oil rubbed bronze."

Danze 4" Lamp Downpour Shower Head with Arm in Chrome:

Danze makes another shower head similar to this but the design is more modern. I liked it better but for the sake of matching the other fixtures and the tub I compromised with this. The smooth face with the pinhole shower sprays was a huge attraction.

LaToscana USCR430 - Chrome Tub Spout:
We are still debating on whether or not to buy this tub spout but I'm sure we'll give in and purchase it soon. The design is more elegant than the tub spout assigned to the set. I suppose I could always give the other tub spout (and shower head) to my Mom if she wants them or list them on Craigslist?

I'm going to turn into a zombie just in time for Halloween.

I'm still alive! We've lost almost all of our workers in my blogging absence. Stanley stopped showing up in typical contractor style (I'm guessing he has another job or two) and he was sending his people over to work without supervision. The problem with that is that his workers are clueless without someone telling them what to do every moment. Areas that were patched and ready to sand were primed and painted before being sanded. Regular sheetrock was going up on my upstairs bathroom ceiling instead of greenboard. All of this and we were PAYING them to mess up our house. Two weeks ago we said enough and good riddence. All of the major things except for the upstairs bathroom are pretty much finished anyway. We have a lot of finishing work and painting to do and of course the dining room molding repair (I'm dreading this the most.)

We have not interviewed any new replacements for the work left. We've just been doing it ourselves. I'm exhausted.
My Father has been putting our upstairs bathroom back together again - and doing an amazing job. He did a bathroom for my Aunt and for my Mother in the past but I didn't realize that he could skim coat! We're hoping that it will be almost entirely done over this coming weekend.


Fernando, my Sister, my Mother and I have all been working on getting the trim sanded, primed and painted. Here's the foyer trim freshly painted in Benjamin Moore's Winter Snow:


I'm dreading painting the ceilings and walls so we may have to hire someone to do that after the floors are done. I'm not very good with a roller and it's hard for me to get walls and ceilings coated evenly. In our last apartment, I painted our bedroom ceiling. It was so uneven and I never got around to covering everything and painting it again. I would lie in bed in the morning and stare at all of the mistakes.

You can see how gross some of our doors were (right, silly) and what they look like now (left) here:


That's our poor kitchen up there. It's definitely going to be the last room we finish. The new cabinets have been ready for weeks and we're going to just have them delivered soon and installed at a later date.
We finally had our little sink re-installed in the powder closet on Sunday. The new faucet is by Pegasus and is from the Halo series. It was only available in brushed nickel which was not my first choice - I usually prefer polished nickel or chrome. Since we don't have any other major things going in here to match to it, I'm sure the brushed finish will be fine. I do like it and it makes washing hands in this small sink easier because with the faucet so high, there is more space to move around. Unfortunately, we didn't plan anything for underneath the sink... so I'll have to figure something out to make it look a little nicer.


Speaking of plumbing, when we did our waterproofing project (now finished) we found a cracked waste pipe in our yard! Most of the ground happens to be clay and the clay was packed around the pipe covering the old crack and stopping it from leaking. As soon as the dirt was removed the yard was getting a little "wash" everytime we flushed. Luckily, we had an amazing plumber named Christopher fix it for us for a nominal fee. Christopher also fixed the pipes behind the wall in our upstairs bathroom and installed that little sink for us.

Here's a shot of the cracked pipe:


And here's Christopher in the hole fixing it:


How brave is he? That hole was underneath our mud room... cramped and scary.

We also had a vintage ball lamp installed in our vestibule. It's on a motion sensor - which makes it even more fun.

I do have a better photo somewhere... next time.

Wednesday, October 8, 2008

i'm digging for dryer

Let me introduce you to our new moat.


It's not completely finished yet... but not bad for one person and two days of digging. It's not all in madness, we're digging down so that we can waterproof our basement. It's not a really damp basement but we do get water accumulating in one area when there are big storms. That one area happens to be the exact spot where we want to put our future washer and dryer. We've already installed the hook-ups and the vintage sink that we just added a drainage pump to is right there, so we can't change the w/d location. When we had the roof and gutters fixed we thought it might fix the problem but twice since then we've had bad storms and about an inch of water in that corner.
This is all the handiwork of Keith. Keith was once a grave digger. More excitingly he used to work on a tugboat. I have an irrational love of tugboats. When you love tugboats, St. George, Staten Island is the place to be... I get to see them every day. ;)
Keith's been having problems with finding a place to store all of the fill. It's already piled up the length of our fence and now we have an enormous mountain in our yard. I swear - the yard really was clean - right before we started our very own Big Dig.